Wednesday, August 31, 2011

Binkie Clip Tutorial

So... Love for Mondays didn't exactly happen.  =(  Fail.
Between a foot-high stack of papers to grade (yes, sewing teachers grade, too), Etsy orders, house managing (i.e. 5 loads of laundry, dishing, vacuuming, bathroom cleaning, and dinner... on a Tuesday night after school), and celebrating a great day at work for my awesome husband, it. wasn't. going. to. happen.
BUT I will not give up.  I will be loving Monday next week (remind me that I said this come Monday morning when I am dragging my feet into school!).
Before I start this sucker, I wanted to show you some new blogs I've found... and LOVE:
  • Kristina J- This one has some really awesome and cute sewing tutorials.  This chick loves Anthropologie (me lovey!), so she often refashions cheaper clothing to look like Anthro stuff (which, if you aren't familiar, is prriiiiiiiiicey).  I am planning on doing This to one of my shirts:

Please and thank you!
  •  Little Miss Momma- SO you just need to go here.  I am obsessed with this blog!  There are so many great tutorials at this site- I want to do them all.  
 Okay- ready for this?  It's not the most exciting tutorial, but it's still a great one.  I am working on some exciting ones for later in the week.  Enjoy!

Here are the supplies you need:

FYI- I ordered these clips on ebay and got them for $.10 each, rather than $1.50 each at Joanns!
First, lay your ribbon on the ironing board.  Fold the end down about 1/2 inch and iron it down.  Lay your fabric right side down on the ironing board.  Iron one of the short ends down about 1/4 inch to the wrong side, as shown:

Lay the ribbon on top of the fabric so that the folds are facing one another, as such:
As you can see in the picture above, fold in each side of the fabric just to the edge of the ribbon.  Iron down.  Fold again so that the sides overlap the ribbon:

With your machine, stitch each of these folds down onto the ribbon from one end to the other:
One end will look this way-this is the end you need to focus on right now!
 Fold the skinny minny ribbon in half and place into the space you created by sewing your folds down.  This should be the side of the ribbon/fabric that you folded.
Sew across to secure the ribbon:
The other end of the ribbon/fabric strip looks like this- and you need to stitch a zig zag across it.
Trim it down and thread through the clip like this:
Stitch a square around this folded part so to secure the clip:
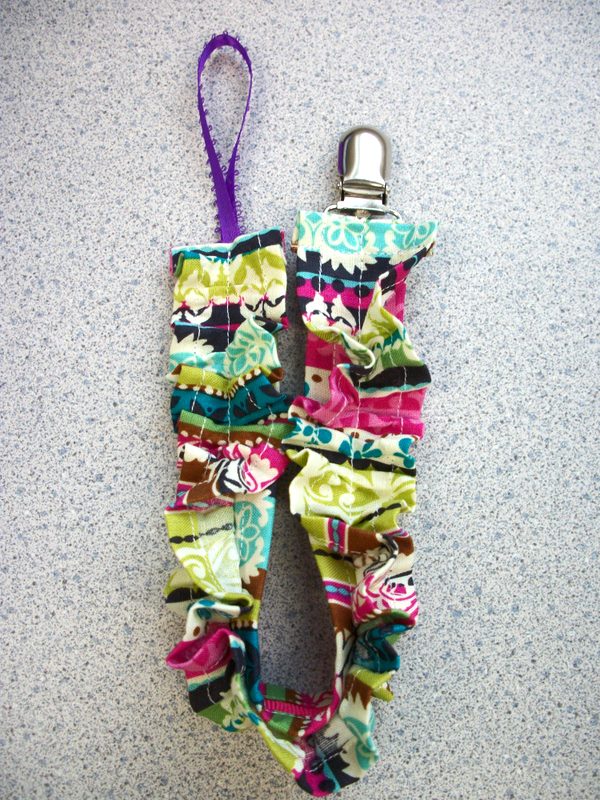
Finished!
I made a ruffled and stitched it on top and looooooooooove it!

This was part of an Etsy order for some twin girls (so sweet!), so this is what was sent:

Oh my goodness.  Adorable.  These clips are great so that binkies don't fall on the floor and get all germie.  I don't have a baby to use them on, but I know Miss Claira wears them often!

Is she not perfect?  I think so!

Here is a teaser of what will come later this week...
Applique!
Peace out.

Wednesday, August 24, 2011

Yo Yo Tutorial

Yo Yo....YO!  Check it out!

Yo yos?
What?
Yes, these little tiny circles of gathered cuteness are called Yo Yos.  I just adore them.  How cute are they?  They are SO easy to make- I teach my kiddies how to hand sew for the first time with this pattern.  We make one for the center of our pin cushions (it's stuffed with.. well, stuffing... and the hole-side is glued down.) and I thought they would be precious on a onesie for my niece-to-be Autumn =)

 You need:
5 inches (less/more, depending on size) of cute fabric
1 Sewing needle
Thread to match

  • First, decide how big you will want the Yoyo once you have finished.  I cut circles out of notebook paper and laid them out on the onesie for visualization.  Once you know the size you want, measure the diameter of the pattern circle.
  •  Mine measured 2.25 inches.  Double this number.  The doubled number will be the diameter of the pattern you need to cut for your fabric.  Because we are making a little "shower cap" of fabric (this is what we call it in my classroom!), we need enough fabric to be gathered to the center and still have the diameter we want- thus, you have to double it.  My new pattern is 4.5 inches in diameter.
You will noticed my finished yoyos are smaller than my "test" ones I laid out.  This is because I thought "Really?  TWICE the diameter?"  I made this one 3.25 inches in diameter and they seriously. are. smaller.  Double your measurement.  Trust me!
  •  Cut out your cute little circles =)
  •  Cut a piece of thread long enough so that you can double thread and knot your needle and sew around the entire circle.  I eyeballed that, so I don't know how long my thread was.  Sorry!  Place your circle on the table with the wrong side facing you.  Fold the edge towards you 1/4 inch.  Sew a running stitch all around the circle, folding as you go.  You want to sew as close to the folded edge as possible. 
I put my needle through several stitches at a time and then pull the needle through.  It is so much faster!

  •  This sounds backward, but the looser or farther apart you sew your stitches, the smaller the hole will be- or the more room there is to pull your stitches together.  If you sew your stitches really close together, your "gathering hole" will be rather large.  You don't want that!  Sew loose stitches- it looks better and is faster!
  • Once you have finished sewing the entire circumference of the circle (man, this tute is full of math vocab!), it should look like this:
  •  Do not knot your needle thread!  Take your needle and gently tug towards you so that the stitches gather.  Once completely gathered, they will make a little "shower cap".
  •  Knot off and cut your threads.  Finished!  Stitch to a onesie, shirt, or headband (I made a matching headband but it's not pictured!) and you have one cutie pie of a baby!
Neckline or corsage?  So many options.  I think I'm going with the neckline.
 Dear Lord, please begin to prepare for me a little one who will grow to love you so... and love wearing homemade fashion as much as I love sewing it!

Tuesday, August 23, 2011

Homemade Laundry Detergent {Tutorial}

Joke around our department is that this is me in commercial form:


Glitter.  So much Glitter!
This is how excited I was to make this detergent!  I love love love finding fun ways to take care of our home and try new things.  This trick is perfect!  We are making this on Thursday at school to finish our unit on laundry- my students will have to do laundry for their families (3 different loads) and they will get to take home enough detergent to do so!  I've included the label that will go on my students' containers.  Feel free to print it for yourself!

Ingredients:
1 Bar Fels Naptha Laundry Soap
1 Cup Borax
1 Cup Super Washing Soda (aka Soda Ash)
1/4 cup Baking Soda
I was able to find these ingredients super easy at our local grocery store.  I'm sure Walmart would carry them, too!
  • First, grate the bar of soap with a cheese grater.  I used this handy dandy gadget, but it actually wasn't that handy!  A cheese grater would work best.  I would suggest wearing gloves, too.  It's a little harsh to touch that much concentration of soap.
     
  • Once you have the whole bar grated, transfer to a food processor.  Grind into a very fine powder.
  • Pour soap "dust" into a bowl.  Add Borax, baking soda, and washing soda. 


  • Mix together!


    Keep in air-tight container!  2 tablespoons is enough for a normal load.  As with all powder detergents, dissolve in the wash water first before adding clothing.  Little pockets of powder in the folds of your clothing can cause the detergent to eat your clothing.  Dissolve first!  I tend to overload my washing machine, so I put in an extra tablespoon.  It has a nice smell in dry form and when the clothes are wet, but the scent will disappear in the dryer.  I love it!  I've heard this also works in HE washers.  Basically, if you can use a powder, this recipe should be okay.  I would read your owners manual.

    I repurposed an applesauce jar that my Grandma canned this summer!
     Printable Label:

I heard this recipe might be too harsh for baby items, but I also know people who do use it {on everything} and love it. I've also heard Borax might not be the best for bright bright colors, but the box says it's a perfect and natural alternative to colorsafe beach... which should mean it'll be okay, Anyway, I've used it on a load of whites and on some jeans/workout shorts. Everything turned out fine!

Cost:
Fels Naptha Soap:  $.99
Borax:  $3.79
Baking Soda:  $2.69 (although I had this already)
Washing Soda:  $3.19
Total:   $10.66

Keep in mind the only thing I used in its entirety is the bar of soap.  I barely made a dent in the other 3 ingredients.  This is way cheaper in the long run than buying detergent.

If you are into "Green" cleaning solutions, The Naturally Clean Home by Karyn Siegel-Maier is an awesome book with tons of recipes:

I didn't get this detergent recipe from it, but it had it in there.  I'm planning on making the dishwasher detergent this week, too!  This book is big on essential oils that you can add for happy smelling.  Also, apparently vinegar is a fabric softener.  Who knew?  It is non-toxic, removes soap residue and prevents static cling in the dryer.  However, vinegar can make dyes in come fabrics run, as with rayon.  Just say no! =)  I will stick to my Aldi softener, thank you!


Monday, August 22, 2011

Love for Monday

Monday totally gets the shaft.  The only thing worse than Monday is Sunday night.  Boo.  So, I'm starting "Love for Monday".  Every Monday, I'll post some things I'm "into" and love.  Not that you care, and not that they're cool, but it's hard to be a teacher (despite what your children tell you, we do work really hard) and find time in the evenings to do blog-worthy things.  This week, we are {hopefully} finishing our wainscoting in the hallways and making a {FREE} home decor project.  Yippee!

Things I’m loving:

Apricots: Crammed with beta-carotene, soluble fiber, vitamin A and C, lycopene, potassium, and lots ‘o other stuff, these things are seriously yummy. I get dried ones and am addicted.  I buy no-sugar-added ones from Aldi for $1.89 for a 6 oz bag (about 25 apricots). One serving is 6 pieces for 100 calories. I think I can handle that. I really like prunes, so if you don’t, I’m not sure if you’d like dried ‘cots or not. They aren’t gooey like prunes. I eat a handful between my 3rd and 4th hours. Delicious!
New running shoes: My mom bought me some new Asics this summer at the outlet mall (Thanks mom) for a great price-half of what they usually are! There is something about new shoes that puts a little hop in my step. My previous shoes have been in use since before I was married-December 22nd will be our 4th anniversary. So, 5 years? I know, horrible. I was starting to get blisters from the plastic breaking through the fabric on my heel. The first time I went for a run with my new wheels, I ran for an extra 15 minutes without any problem. It must be the shoes!
Also, Zumba started back up this week.  Glad to be back to burning 800 calories an hour!

New teaching ideas: I am totally finding ways to incorporate fun things that I enjoy doing in my free time and at home in the classroom. We are making homemade laundry detergent this week! Because I teach sewing and we have a whole textiles unit at the beginning of the semester, we cover how to care for different fibers and types of fabric weaves. I teach them how to sort, select water temp and agitation cycle, how to dry and what to hand wash, and the importance of it all (and all the little steps in between we adults do without thinking). We usually go outside and do some activities with sidewalk chalk if it’s not raining. My students have to do 3 different loads of laundry for their family over the next week. We will be making homemade detergent and everyone will get enough for their 3 loads! So fun. We will talk about being “green”, the cost of buying vs. making, and the ability to reuse things like repurposed jars to keep detergent. I will post a tutorial tomorrow!

We will also be making friendship bracelets in my 6th grade class when talking about friendship. They will be able to give one away to a friend and do some serious math activities with the designs of their bracelets. Sweeeet. It’s also a textile, which is part of the curriculum (as is friendship, in case you think I’m a bad teacher!).

I love what I teach. What is it? Family and Consumer Sciences. And, that is what exactly?

Family and Consumer Sciences (FACS) is the comprehensive body of skills, research, and knowledge that helps people make informed decisions about their well being, relationships, and resources to achieve optimal quality of life. The field represents many areas, including human development, personal and family finance, housing and interior design, food science, nutrition, and wellness, textiles and apparel, and family relations  (Source:  KSDE)

Here are some pictures of one of the high schools in our district. They have an entire culinary program that allows students to experience food prep in a real-life setting. This is their restaurant!  Some of the other schools have “specialties” in different areas of our curriculum and students can choose to go to a high school they wouldn’t normally go to according to border lines if they want a special program. The fashion program puts on runway shows for crying out loud! Preparing students for careers is what we do. Love it. Seriously, I can’t believe I get to work in a district that supports our program this much. So blessed!

This is NOT the cafeteria!  This is the culinary classroom!!
And... that's all I got.  One thing I have learned this week?  6th graders fart.  A lot.  This is not something I like, mostly because I get it right in the face when I bend down to help a kid.  Sick.
 
Come back for the detergent tutorial!

Sunday, August 21, 2011

Morning Quiche

Daniel and I always go to The City Market in Kansas City several times during the summer every year.  It's a farmer's market that sells lots of fruits and veggies and other stuff.  Some of the people are genuine farmers, selling their home grown, organic goods (including baked items... yesss!), while others have mass quantities of non-regional goods that are clearly imported.  Sometimes it's a good deal, sometimes not.  Because I am a deal hound, I usually go to Aldi the day before to see how much their produce is so I can compare prices (sad and ridiculous, I know).  Sometimes, though, there is nothing like fresh corn, peaches, and home grown tomatoes.
LOVE Produce!
Seriously, green bean heaven.  So good!
My sissy on one of our dates a few years ago.  Time flies!  How gorgeous is she?
We went a few weeks ago with some friends and I bought some lovely spices from this guy:
He has everything from toasted sesame seeds and whole pepper corns to smoked paprika and lemon pepper.  Even whole star anise (which, by the way is "licorice" flavored and is a core spice in Chinese Five-Spice).  It looks like this:
I hate licorice, so I don't use or buy it.  But I think it looks so cool!
Almost all of these spices are only one dollar per scoop, which is 1/2 cup or more!  Crazy!  I bought some smoked Paprika, dried mustard, and sesame seeds.  Such a good deal.  You could seriously stock your spice cab for pennies.  My sis-in-law (who is having a baby GIRL in January!) buys her stuff here all the time!
Which brings me to the purpose of this post:  Morning Quiche.
I know it's not a traditional quiche, but this is what my mom always made in the morning on the weekends when we had a "fancy" breakfast.  It is so good and so easy.  Now that school has started and me=no life, I've started whipping out all of my organizational tricks to keep my sanity during the week.  This recipe is one of them.
I'm a pretty strict cereal/skim milk/fruit gal every single morning, but Daniel needs some protein.  Sometimes I buy Jimmy Dean D-Lights sandwiches and he really likes them (Aldi has their own Fit and Active version that he said are better and were 1/3 of the price!  They were on special, though, so I can't find them anymore).  The only drawback is that they're really expensive.  To cut back, I started making this quiche on Sunday nights and it keeps great all week in the fridge.  Daniel heats it up every morning and it's way cheaper than frozen breakfasts.  Make life even easier and use pre-cooked sausage links (I use low sodium turkey sausage, of course!) instead of frying up a chub!

Ingredients:
2-3 pieces of whole-wheat bread
1/2 lb or 1 package of 10 pre-cooked turkey sausage links
1 cup cheese (I usually use Cheddar, but I ran out and used pepper jack this time)
4 eggs
1 cup milk
Salt/Pepper to taste
1/2 tsp dried mustard (from the farmer's market spice man!)
Foil

Directions:
  • Cube bread and place in bottom of sprayed 8*8 pan.  You just need enough bread to cover the bottom.  I used some whole-wheat home-made bread I made last week, so I don't know how many slices I used. 2-3 should be enough!
  •  Chop up sausage.  You can fry up your own (you will only need half of it, though!), but I like to buy the precooked turkey sausage links.  They are cheaper anyway!  Place on top.
  •  Sprinkle Cheese on top.
  •  Mix eggs, milk, salt, pepper, and mustard together and beat well.  I just used a good ole fashioned whisk.  Pour over the top.  It won't cover everything, but when it bakes it will rise!
  •  Bake, covered, at 325 for 30 minutes.  Low and slow for eggs makes them tender, not rubbery!  Take the foil off and bake another 10 minutes.
Done!  Keep covered in the fridge all week, cut and microwave each morning.  Love.
Family walk time and then school time.  Gotta love middle schoolers!


designed with love by beautiful dawn designs