Thursday, June 30, 2011

Patio Furniture Vamp Tramp

** Note:  Clicking on pictures to make them bigger will help you appreciate the vamp!**
I posted on Facebook in February a patio set we bought off of Craigslist for $25.
Did you hear that?
$25.
It is clearly missing some paint and rusting, but it just needed a little buffing and some spray paint.
Seriously.
$25!  Cheap, Yo.
This is Howie Do it:

First step- Leave pup inside!  He was very upset with me...

The Set Up:
Check out our "yard".  Pathetic.  Really, I am so self conscious about the condition of our yard.  It's either barren or Planet of the Crab Grass.  AGH!  I did put the drop cloths under the table to "protect the grass" from paint according to my {obviously blind} husband.  I did it after the picture.  Sorry!
The Supplies:
Two drop cloths and a "wire BBQ brush" from the Dollar store (so $3 people!) and Spray Paint- outdoor use in Satin Finish.  You can see there is only one can in this picture.  Silly Katie, after doing the underside of the table (that's it!), I had to run to Home Depot and get 2 more cans.... which was barely enough.  I did get this on clearance at Joann Fabric for $2.50, though {thank you teacher discount on top of Clearance)!
Check out how much this set needed the paint.  It was thirsty for it for crying out loud!

 I buffed the peeling paint with my "BBQ" brush and was left with..
Mmmm, attractive.
And painted my little heart away!  Note to self:  Do not spray paint in flip flops and without gloves on.  My feet were black except for where the top of the flip flops were, my pink toe nails were speckled with black paint, my feet were black... REALLY, and my hands were stained.  I ruined 2 loofahs in the shower (mine and the guest one- don't tell Daniel but I'll just use his for a while!) and had to scrub the shower floor after I was finished.  Sick!
But, worth every minute of frustration.  Here is the beauty after!
No more rusty butts!
Rrrrrllluusty!  {Inside joke with my sis.  Love you!}

What a beaut. 
Cost?
Table and 4 chairs:  $25
Drop Cloths and Brush:  $3
3 Cans of Outdoor spray paint:  $10
Total:  $38!

It may have been cheap according to my wallet, but not my muscles.  I could barely carry the chairs and had to bring myself to some out-of-body experience to help Daniel get the table up and down the deck stairs.  Pure metal, baby!
Looking for an umbrella for a steal.  Let me know if you see any deals...or curb alerts!

PS If you don't have a rewards credit card, you should totally get one.  We're not credit whores at all- we don't have any credit card balances (actually, we leave like $15 or $20 to build credit.  Paying off your balance every month actually does nothing for your credit!)- but we do have a rewards card with Discover.  At any home improvement store, we get 5% back towards our balance.  With buying our first home and sprucing it up through the good 'ole Home Depot, we just got $50 in rewards.  Sweeeeeeet.  Tiling the entry ways sometime this summer... fo free!

Going blueberry picking this afternoon with my mother- and sisters-in-law at a local patch.  "Pickin' is good" they say.  Supposed to be triple digits easy with the heat index.  Kill me now (from the heat, not the people.  I love my fam!)


Wednesday, June 29, 2011

Basement Makeover Part Deux


First of all..
Dear Lifetime,
I am very upset that you took Greys Anatomy out of your weekdays afternoon lineup and replaced it was another dumb crime drama/comedy-whatever-it-is. I usually love you, but right now, I hate you.  A lot.
Thank you!


P.P.S. I figured out you just cut it down to one episode at noon.  Still, I shake my fist at you.


 Don't tell my husband, but between last week and yesterday, I went to the fabric store 5 times.  Woops!  I didn't spend that much and, combined with Etsy sales, I haven't spent anything and am blessed enough to be on the upside.  Woop woop!  I have loved making and creating new things and designs and being able to sell them.  I went to find some Chenille for burp cloths and Joann's didn't have any white.  They never do and it ticks me off!  So, I perused around the store and remembered I read that their clearance fabric was an additional half off.  Yes please!
The basement has slowly been getting a makeover but, while the new paint looks so much better, it's still missing some life.  We don't spend a lot of time down there except to workout, do laundry and occasionally watch TV when we have company over (as in I am watching one thing and Daniel another), but I need something to make my eye twinkle when I'm down there.
Oh yeah, back to Joann's.
I found some awesome fabric for cheap!  First, a print.  Dry clean only (oh well), but great quality and I love the colors.  The other- a navy apparel fabric.  It was on a makeshift bolt, so I have no idea of the fiber content.  Feels expensive. It wasn't.  I wanted it to be not-so-girlie because it's kind of Daniel's area and I thought I did okay, but he gave me that you-are-off-your-rocker look when I showed him.  He says he likes it, though.  Oh well!
I bought 1.5 yards of the print and 1 yard of the blue to make 5 pillows.  I used the stuffing in the pillows that used to be on the couch to stuff the new ones.  I really like pleats and think they are somewhat manly (when considering bows, ruffles, or fabric flowers), so I went with that.  They kind of coordinate with the pillows I made for the couches upstairs:
Here is before:
I know, it's the before before picture with green walls.  Deal with it.
After:
The lighting is kind of bad in the basement in the evening.  Here's another look at the good picture =)

Yes!  Love love love it.  How much did this cost?
Print:  1.5 yards at $3 yard (originally $12!)=$4.50
Navy:  1 yard at $2 yard
Stuffing:  Had it
Thread:  Had it
=
$6.50!
On a side note, today I spent the day sewing with some girlfriends from church.  We had a blast!  They both have new babies so we sewed 2 nursing covers and I made both babies a pair of baby booties!
Love those chubby legs in these shoes!  Claire's {right} aren't so chubby, but she's only a few weeks old!

I made Tara's baby Claira (not the same baby as Claire) some on Monday and they are precious!
Cannot. Get. Enough.  Making more pairs tonight!


Monday, June 27, 2011

What a Little Mulch Can Do.

Hey there!  It's Monday morning and I woke up early to the sound of feeling like I was in a hurricane.  The rain and wind this morning was terrible!  I didn't sleep well because we watched Inception last night (and didn't finish until 11 on the dot.  10 is our bedtime!) and I kept waking up and telling myself not to fall asleep because A.  Someone was going to come into my mind and steal all of my secrets and ideas and B. I wasn't going to be able to wake up or be able to know if I was conscious in a dream or reality.  Whoa.  Have you seen that movie?  So. Good.  If you have, I want to have a little chat with you about the ending.  =)
Last post I said we were going to get some landscaping done.  It's been on the radar for a while, but we are hosting the youth group Friday night and that was what actually kicked it in gear- thank goodness!  I love doing house stuff with my husband.  There is nothing like the feeling of working together to dream something up, having fun doing it (me coming up with some creative way to either get it cheap, discounted, or free!), and stepping back to say, "Dang!  We done good!".  We didn't do that much yesterday, but it made a huge difference.  Here are some before, during, and after pictures:

Before: March-ish.  Nothing but patches of dead grass.

Still before- but we planted 5 bushes.  We needed a 6th, but never had the chance to go get it.  They sat.  Like this.  So ugly and neglected.  Still, dead grass.

We bought some stones, another bush, and 8 bags of Cypress mulch.  Hard workin man I have!

What I guy (and a looker!).  Love him!

Finito!  I love it.  Yes, we need to trim with the edger- or weedeater- whatever it's called.  Disregard the condition of our lawn!
So so much better.  Our bushes look crooked and it bothers me, but they weren't that way when we planted them.  My engineer of a husband even measured from the side of the house before planting each bush.  They've been growing for 4 months and I think they look crooked because they are so small.. and grew this way or that way.  Grr.  I will come to terms with it I'm sure.  I will love it even more when they become adult bushes!
Yep, we still have dead grass.  The weeds are also taking over our lawn and patio.  I did some serious spraying the other day, but I think it needs another round.  Gah!  I hate not having a plush lawn!
Rose bushes up front.  Before- needing mulch.  After- has mulch.  Not huge, but a little facelift for sure.

Okay, we have a love hate relationship with this plant.  It's in the rose bush bed.  I call it our "Tush" because I think it looks like some deformed tree bush.  A little bush.. that grows tree leaves?  I mean, it reminds me of a bush that, like, grows human hands or something life that.  God, what were you thinking?  I'm sure He thinks it's beautiful and I should too, but I am sinful and I think it's hideous.  One day in heaven I will appreciate it, along with mayonnaise and everything ugly in the world.  Anyway, Daniel loves it which, coupled with his choice to take me as his wife, proves his awful taste in... everything.  =)  Just kidding.  Love you!

If there is anything I have learned since becoming a homeowner, it's that my "perfect house" is a work. in. progress.  It won't happen overnight or in a long weekend.  It take time, savings, and hard work.  I've learned to take my time and do it the right way, not the fast way, and we are loving every minute of it!
How much did this all cost me you ask?
Well, for 6 bushes, 8 bags of mulch, and 24 fourteen-pound stones, I paid.... $30!
Blue Cross Blue Shield KC has a bangin rewards program where you get online and log your exercise for points.  Once you hit 25,000 points, you get a $25 gift card of your choice!  We either choose Home Depot or Visa Prepaid to use anywhere.  We had $65 in cards, which paid for the stones and mulch.  $30 was for our little bushes.

Hello!  Love it!

Friday, June 24, 2011

Happy Birthday Doreen!

Today is my beautiful Mother-in-Law's birthday.
She's the blonde one!
She's a pretty great woman and I am so so beyond lucky that I got to marry her son.  She did such a good job raising him!

We were supposed to go camping this weekend and I was looking forward to 1.  Doing that for the first time ever (Ya, I know, it's ridiculous.  I live in the Midwest and haven't camped.  You'd think I live under a rock for crying out loud!), 2. Spending time with family/church family and 3. Having some cute camping pictures to post.
Welp, that's not going to happen due to some projected crummy weather.  We are going to be able to get some much needed landscaping done before we sponsor the youth group next Friday for dinner and Fireworks.  This makes me very happy, considering I spent an hour and a half the other morning pulling weeds.  Sheesh.  I also need to desperately refinish our outdoor patio set (which I will do this weekend.. maybe tonight?!) and refinish a desk and bookcase for my "office" aka sewing equipment, supplies, notions, and remnants (which will not happen this weekend).

I've been working my tush off at sewing, which has been so fun, but I took a bake-break.  I was inspired by my friend Erin over at Honey Nougats (she's another FACS teacher in our district and is A-to the-Mazing) and my mother-in-law's love of blueberries/her birthday and made some...

Yummy!  Here is the recipe:

  • 1/2 cup butter, softened
  • 1 cup brown sugar, packed
  • 1 egg
  • 1 teaspoon vanilla
  • 1 1/2 cups quick-cooking oats
  • 1 cup flour (Erin used whole wheat, but I didn't have any and was too cheap to go buy some!)
  • 1 -2 teaspoon cinnamon (Where there is cinnamon, let there by Nutmeg!  I added a little bit)
  • 1/2 teaspoon salt
  • 1/2 teaspoon baking soda
  • 1/2 teaspoon baking powder
  • 1 cup blueberries, frooooooozen! 
  1. In a mixing bowl, cream butter and brown sugar. 
  2. Beat in egg and vanilla. 
  3. Combine oats, flour, cinnamon, salt, baking soda and baking powder. 
  4. Gradually add to the creamed mixture.  
  5. Stir in blueberries. Because they are frozen, they shouldn't bleed on your batter!
 6.  Drop by heaping tablespoonfuls 2 inches apart onto lightly greased baking sheets, OR use my BFF:
I did not own one of these until Cheryl bought me one for my bday because I kept going on and one about how much I loved the ones we have in our kitchens at the school.  LOVE IT.
 Bake at 350 degrees for 12-14 minutes.  Remove to wire racks to cool.
 So. Good. 
We even took some to Uncle Dan Dan and Aunt Kaleigh to thank them for babysitting Oscar during VBS last week while I was in Charleston!  They weren't home =(
Can you get enough of him?  I can't!
Did you know that if you don't have baking powder, you can mix 1 part baking soda to 2 parts cream of tartar and use it immediately?  Baking powder is basically baking soda + an acid.  Baking soda needs something acidic in a recipe to react to (doesn't necessarily mean that's something like lemon juice.  Eggs are acidic!).  Baking Powder already has the acid in it (like cream of T), so it will react to a liquid, like water.
Hey, Honey.
If I don't have baking powder, I sure as heck don't have Cream of Tartar!

Thank you Erin for having such awesome recipes!
I've got a cuddle date with a handsome guy and don't want to waste another minute.  See you tomorrow!


Thursday, June 23, 2011

What I learned from Rachael Ray the Other Day

Hilarious.
I found this at Prudent Baby- someone embroidered it.
{Prudent Baby, by the way, is one of my favorite sites!  Check it out!}

I was watching/listening to Rachael Ray's talk show the other morning whilst sewing and learned some interesting facts.  I thought I would share!
  1. Neighborhood Fruit-If you have a fruit tree that produces way too much fruit for you to pick, eat, or use, you can list it on this website and people can come and pick it for you (and keep it!).  You can log on and find fruit trees that other people have listed and go pick theirs, too.  There are also listings of public trees that you can pick from.  Either people in the Midwest A. Don't grow fruit (and I've seen some fruit trees, so that's not it) B. Are too greedy to share it, or C. Don't know about the website because there is nothing-NOTHING- in a 300 miles radius of KC.  Let's prove all the people wrong who think Midwesterners are low-life losers with dial-up Internet and pet cows and log some trees people!  When we lived in the CZ, we used to pick Cherries and Apricots in the fields behind our house and in the neighboring 'hoods.  It. Was. Awesome.  Good memories with my Momma and Daddy!  My dad made some contraption- a 2 by 4 with a hook on the end- to grab tree limbs, pull them down, and grab cherries.  One time, some old Czech lady was yelling at us and, well, we don't know what she was saying.  She was either saying, "Hey, that's my tree" or "Don't hurt the tree".  We didn't know, so we just kept on picking.  She stomped away, probably thinking "Dumb Americans!"  Oh well!
  2. BookMooch:  Register at the website and you can basically swap books for free!  You first make a list of the books you have and the books you want.  Someone says, "HEY!  I want your book!"  You send them your book, pay for the postage, and someone sends you 2 books in return.  Crazy!
  3. You can totally use your dishwasher to do things other than was your dishes.  I have heard about washing baseball caps so that the bill doesn't uncurve, which was one thing they talked about.  You can also wash hair brushes, makeup brushes, light fixtures, and kids' action figures.  The gal (she was from Kenmore) also said that kids' bath toys are the most dangerous toys to have germ wise.  She said we usually think, "Oh, it was in the tub with soap, so it's clean!"  Nope!  Wash them in the dishwasher a few times a week, if not every time.  Did not know that!
  4. You can get things for free using coupons.. which I obviously already knew {see below!}. You can even get druuuuugggsss for free.  Hello!  (Just kidding).  The gal on the show said to ask your pharmacy if they are giving out anything free.  She said sometimes they are samples, sometimes more.  If it is for a prescription or antibiotic, you still need written scripts from the Doc, but hey, FREE!
     Pretty cool is what I am thinking!  Rachael Ray is okay- I actually am starting to enjoy her more than I used to.  Did I get a recipe from her?  Nope- but we did have a bangin' dinner last night, thanks to some Gibson teamwork.  I prep.  Dino cooks.  Good idea.
 
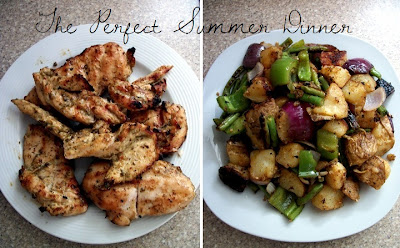
Grilled chicken and vegetables.  There. is. nothing. better.
Whenever my family gets together, we always make this... like 3 times a week, maybe changing the meat.
I "bought"/ got for free {2 for $1 with $1 off 2 coupon!} these new Weber marinades.
They are amazing.  They come in this flavor, Chipotle, and Black Pepper, all of which are fantastic.  It's like some super crazy tenderizer-er. Grilled that up and serve with the following veggies:
  1. Bell Peppers.  Aldi had 3 green for $.99, so that's what I bought.  I like the multi-colored better, but that was more expensive.  Oh well!
  2. Red Onion, cut in half then quartered, pulled apart
  3. Mushrooms (optional- I didn't have any)
  4. Cherry tomatoes (also optional- didn't have those either)
  5. Fresh green beans
  6. Par-boiled potatoes, cut into the same size as the peppers.
Add lots of minced garlic (you really can't have too much!  I used 3 tablespoons from the jar!), Extra virgin olive oil {enough to coat everything}, salt, pepper, and some chili powder.
Really, I have to force myself not to eat this raw (but I always sneak it).  It. Is. Delicious.
Grill in a grill wok/basket like this:
I bought the exact one at Aldi for $6 and it is one of the loves of my life.  Dishwasher safe, never rusts!
Cook until your meat is done and Bam!  Dinner.  We had some corn on the cob, too.  Soooo good.
I know, this looks like a ton!  We cook for 2 meals at a time and always always eat leftovers the next night.  Saves loads of money!  That's also only 3 chicken breasts that I bought for $.79/pound (so, a package of 3 was only $1.75) and filleted to be 6 pieces.  Not as much as it looks, but what a cheap meal!

For dessert we had...
Hello!  Have you tasted these?  So delicious.. and only 110 calories per serving.
What are you having for dinner?

      Wednesday, June 22, 2011

      Boppy Cover Tutorial

      Boppy pillows.
      I don't have any children, but from what I gather, Boppy's are pretty essential... and expensive.
      I was at Target yesterday and saw that they sell the "naked" ones for $24.99 and covered ones for $35.99.  From what I gather, Babies 'R Us is about the same.  Slip covers are about $10 at their cheapest... and they are ugly.  SO, what to do?  Make one!
      A few weeks ago I posted that I found a Boppy at Goodwill for my sister-in-law for $1.99.  The cover is cute, but I would want something cuter... and I wouldn't pay $10 for an ugly one.  To make one, it might cost you $6 and you can pick whatever fabric you want.
      This is Howie do it:


      You will need:

      First- take the cover off a boppy you already have or use this pattern by Prudent Baby.

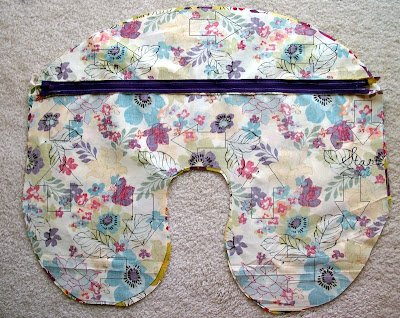
      If you are using the pattern, follow the instructions for piecing it together.  You will lay it out on your fabric the same way.  If you are using a cover you already have, zip the cover back up (now that you have taken it off the pillow) and place it on your fabric like I did.
      I actually got my fabric at remnant price because it was 25 inches long (SO it was only like $1.75.  Crazy.) and on the bolt, so it was a tiny bit short on both sides.  No worries, though- it needs to be snug on the pillow!
      Cut around the cover, leaving about 1/2 inch gap from the cover- this will account for your seam allowance:
      Now, since one side of the cover needs a zipper so that you can take the cover off, let's measure how far down from the top the zipper is placed:
      6 inches!  Easy.  Take ONE side... did you hear that?
      ONE
      Side of the 2 pieces you have cut out and fold it in half.  Measure down from the top six inches and cut across.  Unfold both pieces and you should have the top cut off from the bottom.  Wow, that makes a whole lot of sense, Katie.  Here's what I mean:
      Unfold, and you back piece will now look like this:
      Zippa Time!  Take your zipper from the packaging and place it FACE DOWN.
      FACE DOWN
      FACE DOWN
      WHICH ALSO MEANS TAB DOWN
       On the bottom half, like this:
      Use your machine to stitch your zipper to the bottom piece.  You don't really need to attach your zipper foot- your machine should do just fine.  Sew it on with a 1/4 in seam allowance (that means the right side of your presser foot should line up with the edge of the fabric.. which your zipper should be pinned to so that they are even as well, like in the picture).
      Take your pins out and flip the zipper up so you can see the teeth and tab.  Open the zipper so that you can make sure it works (if you stitch into the teeth, your zipper won't open).  Iron the fabric down.
      Zip it back up, but keep the zipper face up so you can see the teeth.  Take the piece you cut off and lay it right side up on your ironing board.  Take the zippered piece and lay it right side down so that the un-sewn side of the zipper is now even with the straight edge of the top half of the back piece.  Pin them to they are even. 
      Sew the zipper to the top piece the same way you did the first time.  Iron the fabric away from the zipper once you are finished.  Open the zipper again, make sure it works, then zip it back up.  You now should have this:

      Wow!  Almost there.  The hardest part is ova.  Take the side without a zipper and place it right side up on your ironing board.  Take the zippered side (zipper should be zipped up) and lay it face down so that your right sides are together:

      Pin together.  Unzip your zipper, like, an inch.  You are going to sew all the way around the circumference of the cover, stopping where you started.  Do not leave a hole- you will be able to unzip the zipper and turn it right side out!
      Unzip, turn right side out, and put on your pillow!
      If it's too baggy or your center curve is too low, you can turn your cover inside out and take deeper seams.


      Some baby is going to be Boppy-ing in style!  Make one and alternate them when you're washing one cover, Make a "girl" or "boy" cover for a boppy you originally bought for a different sex, or cover a naked Boppy.
      How much did this cost?  $4.  There is no telling how cheap it can  be if you shop sales and use coupons!!

      Everyone loves a cute Boppy- even Oscar!
      He is too much!

       
      designed with love by beautiful dawn designs